How to Practice Writing Cyrillic by Hand
Learning to read Cyrillic is one thing. Learning to write it by hand (especially in cursive) is a completely different challenge. While digital typing dominates modern communication, handwriting Cyrillic helps cement the letters in your memory and opens up the ability to take notes, write letters, or simply understand handwritten Russian text.
Why Bother With Handwriting?
In the age of keyboards, why learn to write Cyrillic by hand?
Memory Retention: The physical act of writing activates different parts of your brain. You'll remember letters better when you've written them hundreds of times.
Reading Handwritten Text: Russian handwriting (especially cursive) can look completely different from printed text. If you can't write it, you'll struggle to read it.
Practical Use: Taking notes in Russian classes, writing letters, filling out forms while traveling, or keeping a language journal all require handwriting.
Cultural Authenticity: Native Russians learn cursive in school. Being able to write in cursive makes you more connected to the language.
Print vs. Cursive: Know the Difference
Russian has two distinct handwriting styles:
Printed (Печатные буквы):
Individual letters, similar to typed text. Each letter stands alone. This is what you should learn first.
Cursive (Прописные буквы):
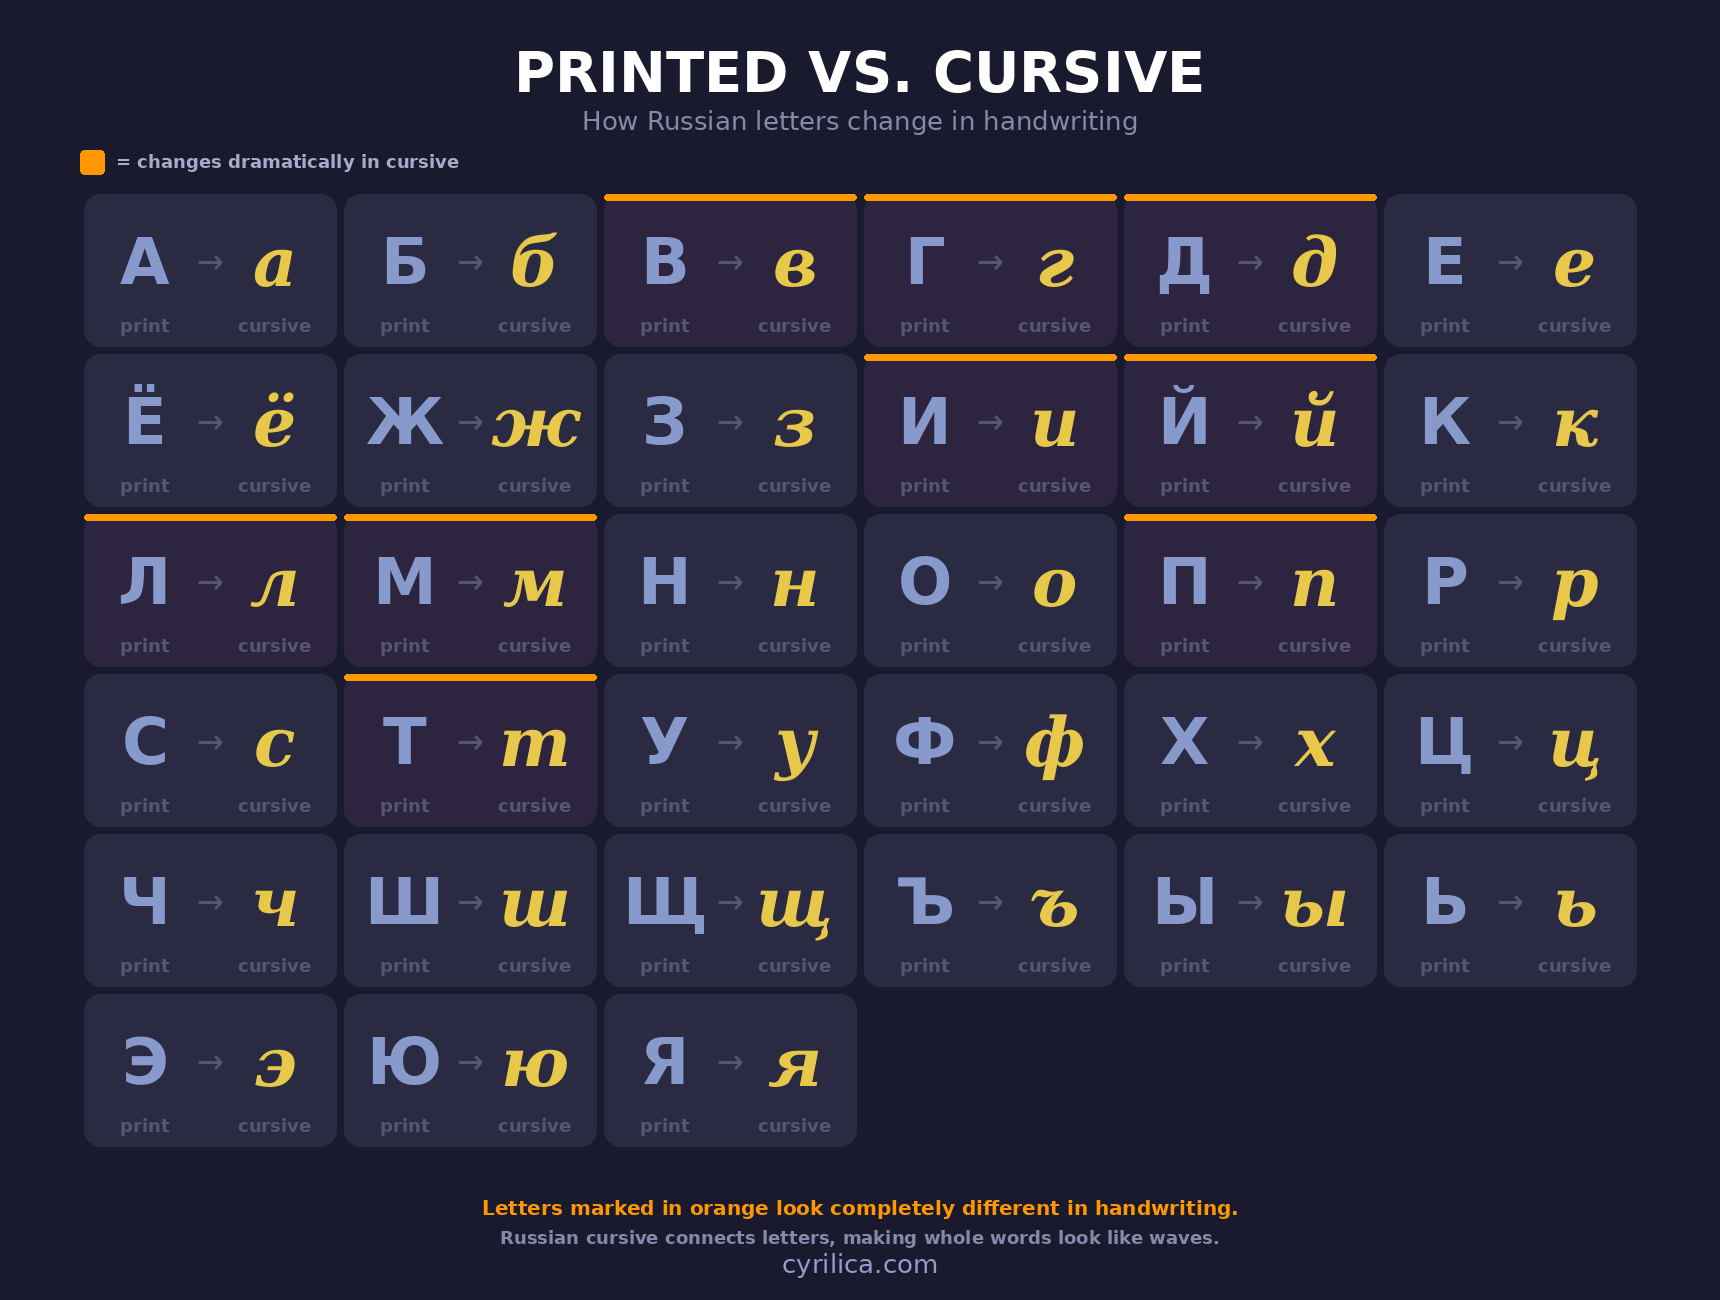
Connected, flowing script. Letters link together. Some letters look completely different from their printed forms. Russians learn this in elementary school and use it for everything.
Start with print to build basic muscle memory, then move to cursive once you're comfortable.
The Printed Alphabet: Your Foundation
When writing printed Cyrillic, follow these principles:
Stroke Order Matters:
Just like in English, there's a conventional order for writing strokes. Following it makes writing faster and more natural.
General rules:
• Top to bottom
• Left to right
• Outside strokes before inside details
Example: Д (D)
1. Left vertical line (top to bottom)
2. Diagonal to top right
3. Right vertical line (top to bottom)
4. Horizontal base with "feet"
Letters That Look Different When Handwritten
Some printed letters have different handwritten forms:
Т (T):
• Printed: Т (looks like T)
• Handwritten: Usually written like lowercase 'm' in English
Д (D):
• Printed: Д (house shape)
• Handwritten: Often looks like English 'g' or 'd'
Г (G):
• Printed: Г (backwards L)
• Handwritten: Often looks like number '2' or English 'r'
The Cursive Challenge
Russian cursive is notorious. Some letters become nearly unrecognizable. Here are the worst offenders:
Т (T) in cursive: Looks like English 'm'
П (P) in cursive: Looks like English 'n'
Ш (Sh) in cursive: Looks like English 'w' but continues to the next letter
Д (D) in cursive: Has a big loop, looks like English 'g'
The "ишишишиши" problem:
Multiple letters in cursive can create identical-looking sequences. The word "шиши" looks like "uuuu" in cursive. You have to use context to figure out what letters they actually are.
Before you write, make sure you can recognize each letter. Our quiz builds letter recognition fast.
Watch the Tricky Letters Being Written
Reading about cursive only gets you so far. The six letters below cause most of the confusion, and the fastest way to make sense of them is to watch the pen. Tap a letter to see it drawn stroke by stroke, the way it is taught in Russian school copybooks, and slow it down if you want to follow the direction.
Tap a letter above to watch it being written.
The pattern worth noticing: т is rounded on top, three humps like a Latin m. и and ш are rounded on the bottom, two cups and three. л and м lean in with a small hook before their first stroke, and that hook is what separates them from the hump letters around them. д drops a loop below the line like a Latin g. Many writers also add a small bar above т and a line below ш to keep them apart in fast writing. Once you can spot humps, cups, hooks, and tails, words like лишишься stop being a wall of identical bumps.
Practice Method: The Proven System
Step 1: Learn Stroke Order (Week 1)
Practice each printed letter 20 times, focusing on correct stroke order. Don't rush.
Step 2: Write Simple Words (Week 2)
Combine letters into words. Start with easy ones like:
• МАМА (mama)
• ПАПА (papa)
• КОТ (cat)
• ДОМ (house)
Step 3: Copy Real Text (Week 3)
Find Russian sentences and copy them by hand. Children's books are perfect for this.
Step 4: Introduction to Cursive (Week 4)
Learn cursive versions of each letter. Practice connecting them.
Step 5: Cursive Words (Week 5+)
Write full words in cursive. Start with short words and build up.
Practice Resources
Printable Worksheets:
Search for "Russian handwriting worksheets" or "прописи" (propisi). Many are free online.
Tracing Practice:
Start with dotted letters you can trace. This builds muscle memory for the shapes.
Grid Paper:
Use quadrille (graph) paper. Russians typically learn to write on squared paper, which helps with letter proportions.
Russian Children's Workbooks:
Books titled "Прописи" are designed for Russian first-graders learning to write. Perfect for adult learners too!
Common Handwriting Mistakes
1. Mixing Print and Cursive
Don't randomly switch between printed and cursive letters in the same word. Pick one style and stick with it.
2. Wrong Stroke Order
Starting from the bottom or right side makes letters look wrong and slows you down.
3. Inconsistent Letter Size
Some letters (like Д, Р) should be taller. Others (like а, о) should be smaller. Maintain proportions.
4. Not Connecting Cursive Letters
Cursive letters should flow together. Lifting your pen between every letter defeats the purpose.
5. Confusing Cursive т and ш
Both can look like 'm' shapes. Practice distinguishing them through context and careful formation.
Speed vs. Legibility
When starting out, prioritize legibility over speed. Write slowly and carefully. Speed comes naturally with practice. Clarity doesn't.
Russians who write cursive quickly often produce text that looks like scribbles to learners. That's fine for them (they can read their own handwriting), but as a learner, focus on making each letter clear and distinct.
Daily Practice Routine
15 minutes daily beats 2 hours once a week. Here's a quick routine:
Minutes 1-5: Write the alphabet (printed or cursive)
Minutes 6-10: Copy 3-5 Russian sentences from a book or article
Minutes 11-15: Free writing: write anything in Russian. Your shopping list, today's date, simple sentences.
Repeat daily. In a month, you'll see massive improvement.
The Satisfaction Factor
There's something deeply satisfying about being able to write Russian by hand. When you can jot down notes during a language class, write a postcard to a Russian friend, or simply sign your name in Cyrillic, you've crossed a threshold from "learning about Russian" to "using Russian."
Plus, cursive Russian looks beautiful when done well. The flowing connections, the rhythmic loops. It's genuinely aesthetic.
So grab a pen, find some grid paper, and start writing. Your hand might cramp at first, and your letters might look wonky, but that's how everyone starts. With practice, you'll develop your own Russian handwriting style, and that's when it really becomes yours.